
Synergy
Synergy是一个跨平台的 鼠标、键盘、剪切板共享软件,支持Windows,Mac,Linux主流桌面平台。今天我就手把手把这个软件分享给大家。
如果你在用两台电脑,你是如何在他们之间传输文件的,又是如何切换键盘鼠标的,诚然我知道Windows官方出的鼠标有 无界 功能。今天我介绍的synergy软件,你用了之后,你就再也不用在微信的 文件传输助手 上互传文件了,直接在这个电脑复制,在另一个电脑上粘贴!不受硬件限制,只要两台电脑ip互联互通。
无界鼠标由于是微软出品的,所以只支持 Windows 平台,安装包也是 MSI 文件格式。
Synergy-core 是开源的
cli程序.
官网:https://symless.com/synergy
开源地址:https://github.com/symless/synergy-core
下载
GUI版程序只能官网付费上下载,没有登陆App Store, 还有点需要注意1.8.8及以前的版本都是32位的程序,所以这次来折腾下64位的开源版。
Mac OS Cotalina 开始,就完全不能运行32位的程序了
安装
如果是官网下载Synergy GUI版,那双击就完事了。
编译
这里说下github上开源的core版本,编译,安装。
Mac OS 环境
安装依赖,编译软件,编译,安装:
# Install Homebrew

## 安装相关编译软件
$ brew install cmake
$ brew install qt
$ brew install openssh
$ brew install git

## 检查qt 安装信息,以及目录,等下需要用到 /usr/local/Cellar/qt/5.15.0/Frameworks/
$ brew info qt

## 添加一个环境变量
$ export CMAKE_PREFIX_PATH="/usr/local/Cellar/qt/5.15.0/Frameworks/"

# 下载源码并进入源码目录
$ git clone https://github.com/symless/synergy-core.git
$ cd synergy-core
$ mkdir build
$ cd build
## 准备编译参数
$ cmake -DCMAKE_OSX_SYSROOT=/Applications/Xcode.app/Contents/Developer/Platforms/MacOSX.platform/Developer/SDKs/MacOSX10.15.sdk  -DCMAKE_OSX_DEPLOYMENT_TARGET=10.15 -DCMAKE_OSX_ARCHITECTURES=x86_64
## 编译
make
Windows 编译
这里我在Windows 环境安装了 最新Qt,和 Visual Studio community 2019.
Add C:\Qt\Tools\QtCreator\bin to the system PATH
Set CMAKE_PREFIX_PATH environment variable
C:\Qt\5.12.5\msvc2017_64
$ cd Projects\synergy
$ mkdir build
$ cd build
$ call "C:\Program Files (x86)\Microsoft Visual Studio 14.0\VC\vcvarsall.bat"
$ cmake -G "Visual Studio 14 2015 Win64" -DCMAKE_BUILD_TYPE=Debug ..
$ msbuild synergy-core.sln /p:Platform="x64" /p:Configuration=Debug /m
$ cd ..
$ copy ext\openssl\windows\x64\bin\* build\
$ cd Projects\synergy-core
$ mkdir build
$ cd build
$ call "C:\Program Files (x86)\Microsoft Visual Studio\2019\Community\VC\Auxiliary\Build\vcvarsall.bat" x86_amd64
$ cmake -G "Visual Studio 16 2019" -DCMAKE_BUILD_TYPE=Debug ..
$ msbuild synergy-core.sln /p:Platform="x64" /p:Configuration=Debug /m
Linux 编译
$ cd Projects/synergy
$ mkdir build
$ cd build
$ cmake ..
$ make
编译成功,会生成3个可执行文件。编辑后产物在:
./synergy-core/build/bin/
可执行文件
synergy-core
命令行程序:synergy-core, synergyc, synergys.
Synergy Core v1.x
对于1.x版本,client,server是两个程序,也就是分别对应:synergyc,synergys。
| OS | Command |
|---|---|
| Windows | synergyc [server IP] |
| macOS | ./synergyc [server IP] |
| Linux | ./synergyc [server IP] |
| OS | Command |
|---|---|
| Windows | synergys -c [path to config file] |
| macOS | ./synergys -c [path to config file] |
| Linux | ./synergys -c [path to config file] |
Synergy Core v2.x
v2.x,server,client 都是一个程序了,通过不同的命令来确定自己的职责。
| OS | Command |
|---|---|
| Windows | synergy-core --client [server IP] |
| macOS | ./synergy-core --client [server IP] |
| Linux | ./synergy-core --client [server IP] |
| OS | Command |
|---|---|
| Windows | synergy-core --server -c [path to config file] |
| macOS | ./synergy-core --server -c [path to config file] |
| Linux | ./synergy-core --server -c [path to config file] |
Command help
通过一下命令:
$ ./synergyc --help
$ ./synergys --help
你能获取v1.x synergy的帮助信息,但是v2.x不知道是不是忘了把这个加上。
$ ./synergy-core --help ## 不会显示帮助信息
所以我就把它应有的帮助信息放这里了。
Options for synergy-core --client
Usage: synergy-core --client [--yscroll <delta>] [--daemon|--no-daemon] [--name <screen-name>] [--restart|--no-restart] [--debug <level>] <server-address>

Connect to a synergy mouse/keyboard sharing server.

  -d, --debug <level>      filter out log messages with priority below level.
                             level may be: FATAL, ERROR, WARNING, NOTE, INFO,
                             DEBUG, DEBUG1, DEBUG2.
  -n, --name <screen-name> use screen-name instead the hostname to identify
                             this screen in the configuration.
  -1, --no-restart         do not try to restart on failure.
*     --restart            restart the server automatically if it fails.
  -l  --log <file>         write log messages to file.
      --no-tray            disable the system tray icon.
      --enable-drag-drop   enable file drag & drop.
  -f, --no-daemon          run in the foreground.
*     --daemon             run as a daemon.
      --yscroll <delta>    defines the vertical scrolling delta, which is
                             120 by default.
  -h, --help               display this help and exit.
      --version            display version information and exit.

* marks defaults.

The server address is of the form: [<hostname>][:<port>].  The hostname
must be the address or hostname of the server.  The port overrides the
default port, 24800.
Options for synergy-core --server
Usage: synergy-core --server [--address <address>] [--config <pathname>] [--daemon|--no-daemon] [--name <screen-name>] [--restart|--no-restart] [--debug <level>]

Start the synergy mouse/keyboard sharing server.

  -a, --address <address>  listen for clients on the given address.
  -c, --config <pathname>  use the named configuration file instead.
  -d, --debug <level>      filter out log messages with priority below level.
                             level may be: FATAL, ERROR, WARNING, NOTE, INFO,
                             DEBUG, DEBUG1, DEBUG2.
  -n, --name <screen-name> use screen-name instead the hostname to identify
                             this screen in the configuration.
  -1, --no-restart         do not try to restart on failure.
*     --restart            restart the server automatically if it fails.
  -l  --log <file>         write log messages to file.
      --no-tray            disable the system tray icon.
      --enable-drag-drop   enable file drag & drop.
  -f, --no-daemon          run in the foreground.
*     --daemon             run as a daemon.
  -h, --help               display this help and exit.
      --version            display version information and exit.

* marks defaults.

The argument for --address is of the form: [<hostname>][:<port>].  The
hostname must be the address or hostname of an interface on the system.
The default is to listen on all interfaces.  The port overrides the
default port, 24800.

If no configuration file pathname is provided then the first of the
following to load successfully sets the configuration:
  $HOME/.synergy.conf
  /etc/synergy.conf
配置
GUI的配置就不讲了,这里说下cli程序的配置。
原文在这里Synergy Text Config,我这里简单提一下。然后按照我给的模版来改改就能用,需要特殊定制可看看官方wiki,或者留言问我。
Synergy 的配置文件基本格式:
section: ''name''
    ''args''
end
配置类型有4大类:
- screens
- aliases
- links
- options
aliases
定义 host name 和 屏幕命名的关系。
那么如何获取 host name呢?
mac os 环境下:
$ hostname
## 或者
$ echo $HOSTNAME
screens
定义我们的屏幕,命名,以及在操作各个屏幕时,是否响应一些特殊按键。
Windows,Linux,Mac 都有各自的特殊按键,如win, command, meta按键等,如果不是跨平台,都不需要做特殊处理。
links
定义各个屏幕之间的排列方位,这个很重要。
{left|right|up|down}[<range>] = name[<range>]
关于range参数就比较有意思了,合理配置可是下如下效果。
section: links
     moe:
         right        = larry
         up(50,100)   = curly(0,50)
     larry:
         left         = moe
         up(0,50)     = curly(50,100)
     curly:
         down(0,50)   = moe
         down(50,100) = larry(0,50)
 end
实现了:
#       +-----------+
#       |   curly   |
#       |           |
#       +-----------+
# +----------+ +----------+
# |    moe   | |  larry   |
# |          | |          |
# +----------+ +----------+
也就是在curly屏幕时,鼠标往左下滑,会滑到moe屏幕,往右下滑,会滑到larray屏幕。
options
其他选项,例如定义心跳间隔,屏幕切换粘连时间,
配置样例
好的还是来一个大而全的配置文件例子吧。
启动一个Synergy-core server,配置文件是必须的!
Example textual configuration file
This example comes from doc/synergy-basic.conf
# sample synergy configuration file
#
# comments begin with the # character and continue to the end of
# line.  comments may appear anywhere the syntax permits.
# +----------+  +---------+ +---------+
# | mac-mini |  | macbook | | windows |
# |          |  |         | |         |
# +----------+  +---------+ +---------+

section: screens
    # three hosts named:  mac-mini, macbook, and windows
    # These are the nice names of the hosts to make it easy to write the config file
    # The aliases section below contain the "actual" names of the hosts (their hostnames)
    mac-mini:
    macbook:
    windows:
end

section: links
    # windows is to the right of macbook
    # mac-mini is to the left of macbook
    macbook:
        right(0,100) = windows # the numbers in parentheses indicate the percentage of the screen's edge to be considered active for switching)
        left  = mac-mini
        # shift = shift (shift, alt, super, meta can be mapped to any of the others)

    # macbook is to the right of mac-mini
    mac-mini:
        right = macbook

    # macbook is to the left of windows
    windows:
        left  = macbook
end

section: aliases
    # The "real" name of windows is John-Smiths-windows-3.local.
    # If we wanted we could remove this alias and instead use John-Smiths-windows-3.local everywhere windows is above.
    # Hopefully it should be easy to see why using an alias is nicer
    macbook:
        Pauls-MBP.local
    mac-mini:
        jumei-deMac-xp-mini.local
end

section: options
    switchDelay = 400   # 鼠标滑到边缘时,提留多久才能切换屏幕
    clipboardSharing = true # 共享剪切板
    clipboardSharingSize = 10000    # 剪切板共享字节大小限制,单位:千字节
end
启动
## 启动服务端
$ ./synergy-core --server --address 172.20.50.25:24800 --no-daemon --name macbook --config ./synergy.conf

## 启动其中一个客户端
$ ./synergy-core --client --no-daemon --name mac-mini 172.20.50.25:24801
常见问题
问题1:FATAL: An error occurred: assistive devices does not trust this process, allow it in system settings.
这是应为你运行命令行程序调用了系统的敏感接口,所有报错了。你需要给这个命令行软件授予权限.
也就是说,你用iTerm运行Synergy-core,就给iTerm授权,你用系统terminal运行的就给terminal授权。
我用的Mac,就在 系统偏好设置 > 安全性隐私 > 隐私 为其配置上。
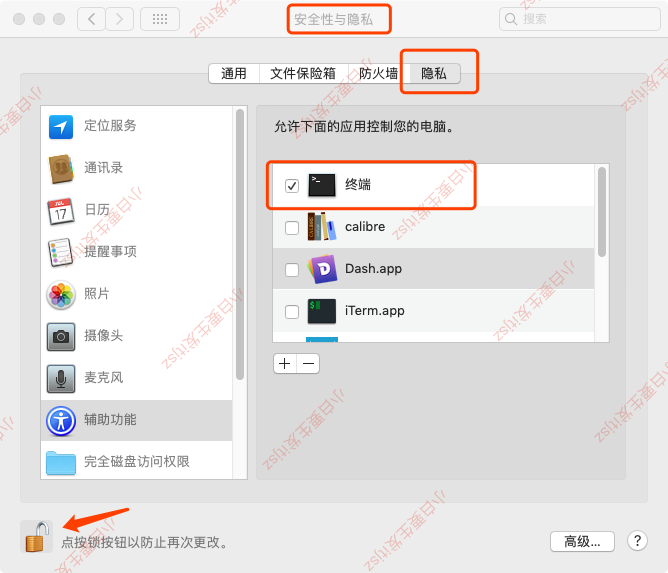
如果是第一次授权,一般会有个弹窗,你按照弹框点进去就行了。
问题2: synergy-core[66198:16759205] pid(66198)/euid(501) is calling TIS/TSM in non-main thread environment, ERROR : This is NOT allowed. Please call TIS/TSM in main thread!!!
你是不是还启动 Synergy GUI 程序,把它关掉就好了。
总结
synergy-core程序用着还不错,虽然配置麻烦了一点,不过鼠标,键盘映射都没问题,复制粘贴(图片都能跨屏幕传)也都正常。不过还没试过跨macos,windows使用过。试了再回来
参考
- https://github.com/symless/synergy-core/wiki
- https://my.oschina.net/k4nz/blog/4337405
- https://apple.macx.cn/thread-2174542-1-1.html